

How To Make Curved Wood
How to Bend Woods
Bending hardwood trim for a countertop

Curved hardwood nosing on a countertop tin really make your project stand up out. Hither's how to brand a 3/four-in. laminated hardwood nosing that bends perfectly around round countertop corners.
You might likewise like: TBD
Starting time, purchase or make the strips
There are several ways to tackle this tough chore, but bending wood and laminating several thin strips to create 3/4-in. nosing volition give yous the best results. The starting time pace is to buy or brand thin stock (1/8 to 3/xvi in.) for the nosing. For the counter shown in the photos below, we planed ane/four-in. 10 two-in. red oak down to ane/8 in. thick. You can also create sparse strips past ripping 2-in. thick stock on a table saw with a loftier-quality, smooth-cut ripping blade. The strips should be at least i/viii in. wider than the finished nosing to let for sanding. They should also be long plenty to leave tails that will run a few feet along the straight role of the countertop where yous'll splice in the remaining nosing.
Be sure to select boards with fairly straight grain and no knots so they tin bend without breaking. To brand the boards even more pliable, nosotros soaked them in hot water in a x-ft. aluminum gutter. All the same, if the radius is large plenty, you lot may be able to skip this footstep. Just make a few extra strips and do a dry out exam to find out.
Next, glue up the laminated trim
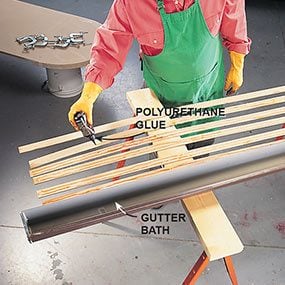
Prepare the hardwood strips
After cutting and soaking the hardwood strips, utilise a coat of polyurethane glue to one side of each strip.
Gluing upwards the laminated hardwood trim
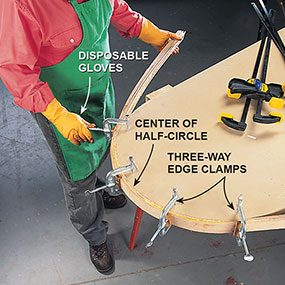
Using three-way edge clamps, begin clamping the stack of strips at the center of the half-circle.
If you soak your boards, apply polyurethane glue to laminate them together. Polyurethane glue, which needs moisture to work, gives a long working time and fills gaps well. Exist certain to vesture gloves; this stuff tends to make a mess.
Spread the glue, stack the strips together and attach them in one footstep. Using iii-fashion edge clamps (available at home centers), brainstorm clamping the stack of strips at the center of the one-half-circle. Get out all the clamps in place for at to the lowest degree 12 hours. Retrieve, you can't accept too many clamps, especially for this job.
Angle Wood with H2o: Finally, keep it wet while information technology dries

Periodically run a wet sponge over the finished assembly
Since the outside dries first, it's a good idea to wet the outer face ofttimes for the first three or iv hours.
If you soak the strips, it's a skilful idea to wet the outer face frequently for the kickoff three or 4 hours. This will help preclude the outer strip from cupping away from the face, since the exterior dries first. An fifty-fifty better option is to clench an unglued sacrificial strip on the outside so the layers tin dry evenly.
Even though this wood-bending technique is fourth dimension-consuming and challenging to master, it'southward so absurd that once you've tried it, you'll probably find some excuses to endeavour it again.
Tip: The polyurethane glue will begin to foam every bit it cures. You can hands scrape the cream off when information technology's dry out.
Required Tools for this Project
Have the necessary tools for this angle forest DIY project lined up before you showtime—y'all'll save time and frustration.
Required Materials for this Project
Avert last-minute shopping trips by having all your materials ready ahead of time for bending wood. Here's a listing.

Source: https://www.familyhandyman.com/project/how-to-bend-wood/
Posted by: williamsforeence.blogspot.com
0 Response to "How To Make Curved Wood"
Post a Comment